


做
Java开发的同学,提到RPC(远程调用)可能首先会想到阿里的开源项目Dubbo或者RMI或者Spring Cloud等。 确实这些项目都比较优秀, 尤其是Dubbo各方面都很出彩。但是可能很多同学还不了解Dubbo是怎么一个运行机制。 那么本文我们就用一个最简单的方式来实现一个RPC调用。
前言
首先需要明确一下, 本文中的RPC调用,是类似RMI和Dubbo的直接调用到service方法的调用。 而不是类似Spring Cloud调用其他REST API 。
首先,假设我们有一个user-api.jar, 里面包含一个UserService:
public interface UserService {

	//传入登录参数,返回用户信息
	UserVO login(LoginParam loginParam);

    	UserVO getById(Long id);

}
它的实现类是这样的:
public class UserServiceImpl {
	public LoginVO login(LoginParam loginParam) {
		LoginVO vo = new LoginVO();
		... 具体的登录逻辑省略
		if (loginSuccess) {
			vo.setSuccess(true);
			vo.setMsg("登陆成功");
		} else {
			vo.setSuccess(false);
			vo.setMsg("登陆失败! 用户名或密码错误!");
		}
		return vo;
	}

    public UserVO getById(Long userId) {
    	...
    }
}
正常情况下,它的实现类是部署在远端机器上的,我们暂且成为 Remote Server。
然后,假设我们有一个部署在其他机器的订单服务,需要调用到用户服务。 代码类似这样:
	@Service
	public class OrderServiceImpl implments OrderService {

        	@Autowired
    		private UserService userService;

            public void createOrder(...) {
            	...
            	UserVO userVo = userService.getById(userId);
            	...
            }
    	}
可以看到,订单服务调用用户服务,就跟调用本地service一样简单便捷。 这就是RPC远程调用。
他们的调用过程大致类似下图:
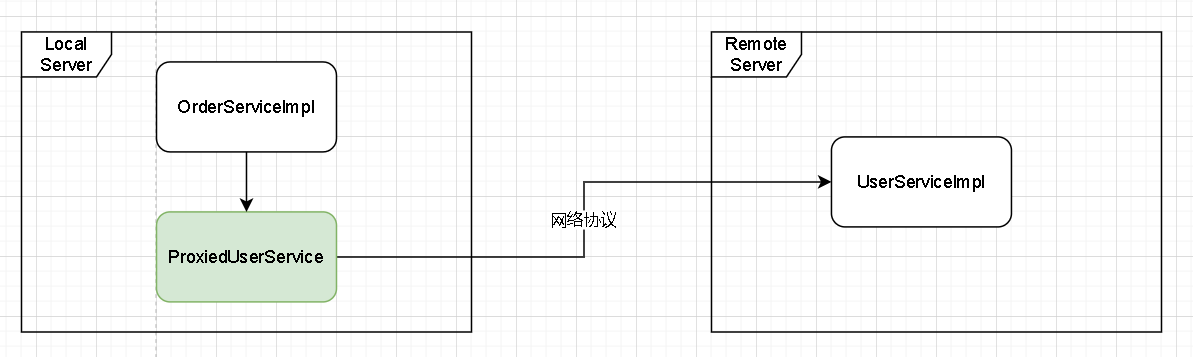
其中,绿色的ProxiedUserService是用动态代理生成的一个对象, 它实现了UserService接口,并且负责调用真正的远程机器上的UserServiceImpl服务。这个动态代理对象,也是我们要重点实现的地方。
自主实现简单的RPC调用框架
为了简单起见, 我们使用http协议来做网络通讯。
调用远程服务需要什么信息
首先我们考虑,调用远程服务的方法都需要什么信息:
- 我们需要知道方法签名,即 类全路径 + 方法名 + 参数类型 + 返回值类型
- 要准备好调用方法的各个参数
上述这些基本信息,就能够满足基本的服务远程调用。当然,如果还要实现其他的特性,需要的信息会更多。
基于上述分析,我们先来定义一个DTO,用来传递远程调用所需的信息。
InvocationInfo
    @Data
    public class InvocationInfo implements Serializable {
        public static final String separator = "#";

        @NotEmpty
        private String invokeClass;
        @NotEmpty
        private String invokeMethod;

        private List<String> methodParamTypes;

        private List<Object> params;


	    /**
            * 获取方法签名, 形如:com.xxx.xxx.xxx.UserService#getById#java.lang.Long
            **/
        public String getMethodSignature() {
            StringBuilder builder = new StringBuilder();
            builder.append(invokeClass).append(separator)
                    .append(invokeMethod).append(separator);
            if (!CollectionUtils.isEmpty(methodParamTypes)) {
                for (String paramType : methodParamTypes) {
                    builder.append(paramType).append(separator);
                }
            }

            return builder.toString();
        }
    }
调用远程服务时, 我们将此DTO序列化为byte数组,然后用Base64编码,将编码后的字符串发送到Remote Server。 Remote Server 接收到此字符串,通过Base64解码,然后将byte数组反序列化为DTO对象。
所以我们还需要一个序列化工具类:
SerializeUtil
    @Slf4j
    public class SerializeUtil {

        public static String serialize(Object object) throws IOException {
            if (object == null) {
                return null;
            }

            try (ByteArrayOutputStream outputStream = new ByteArrayOutputStream();
                 ObjectOutputStream objectOutputStream = new ObjectOutputStream(outputStream);
                ) {
                objectOutputStream.writeObject(object);
                objectOutputStream.flush();
                return Base64.getEncoder().encodeToString(outputStream.toByteArray());
            }
        }

        public static Object deserialize(String serial) throws IOException, ClassNotFoundException {
            if (StringUtils.isEmpty(serial)) {
                return null;
            }

            try (ByteArrayInputStream inputStream = new ByteArrayInputStream(Base64.getDecoder().decode(serial));
                 ObjectInputStream objectInputStream = new ObjectInputStream(inputStream)) {
                return objectInputStream.readObject();
            }
        }

    }
Remote Server 端的调用逻辑
现在我们确定了使用http协议, 传递参数InvocationInfo来调用远程服务。 那么Remote Server需要一个 Servlet 或 RestController 来接收请求,并调用指定的Service的方法。
InvocationRestController
    @Slf4j
    @RestController
    @RequestMapping("/rpc/invocation")
    public class InvocationRestController implements ApplicationContextAware {

            ...

            // 远程调用的入口,接收参数,并调用本地服务
            @RequestMapping(value = "/invoke", method = RequestMethod.POST)
            public void invoke(@RequestBody String param, HttpServletResponse response) {
                try {
                    InvocationInfo invocationInfo = (InvocationInfo) SerializeUtil.deserialize(param);
                    Object obj = doInvoke(invocationInfo);
                    writeResponse(response, RpcResult.ok(obj));
                } catch (Exception e) {
                    log.error(e.getMessage(), e);
                    writeResponse(response, RpcResult.fail(e));
                }
            }

		//根据DTO信息,从本地Spring容器中获取接口的实现类。调用实现类的方法
	     private Object doInvoke(InvocationInfo invocationInfo) throws ClassNotFoundException, InvocationTargetException, IllegalAccessException {
                    Class serviceType = loadClass(invocationInfo.getInvokeClass());
                    Class[] paramTypes = loadClassArray(invocationInfo.getMethodParamTypes());

                    Object target = getBean(serviceType);
                    Method method = findMethod(invocationInfo, serviceType, paramTypes);
                    if (method == null) {
                        throw new RpcInvokeException("无法找到要执行的方法!");
                    }

                    Object[] params = parseParams(invocationInfo, paramTypes);
                    Object ret = method.invoke(target, params);
                    return ret;
                }

                ...
	}
Local Server端的调用逻辑
1. 如何生成代理对象
为了简单起见,我们直接采用JDK动态代理。
ServiceProxyHandler
    @Slf4j
    public class ServiceProxyHandler implements InvocationHandler {
        //远端服务的HTTP调用地址
        private String url;

       //针对哪个远端接口的代理
        private Class serviceType;

         //HTTP调用工具类
        private RestTemplate restTemplate;

        public ServiceProxyHandler(String url, Class serviceType, RestTemplate restTemplate) {
            this.url = url;
            this.serviceType = serviceType;
            this.restTemplate = restTemplate;
        }

        @Override
        public Object invoke(Object proxy, Method method, Object[] args) throws Throwable {
            if (StringUtils.equals("toString", method.getName())) {
                return proxy.toString();
            }

            InvocationInfo invocationInfo = getInvocationInfo(method, args);
            RpcResult result = invoke(invocationInfo);
            return result.getData();
        }

        private Class loadClass(String className) throws ClassNotFoundException {
            Class clazz = Class.forName(className);
            if (Map.class.isAssignableFrom(clazz)) {
                return Map.class;
            }

            if (List.class.isAssignableFrom(clazz)) {
                return List.class;
            }

            return clazz;
        }

		//获取参数DTO
        private InvocationInfo getInvocationInfo(Method method, Object[] args) {
            InvocationInfo invocationInfo = new InvocationInfo();
            invocationInfo.setInvokeClass(serviceType.getName());
            invocationInfo.setInvokeMethod(method.getName());

            List<String> paramTypes = Lists.newArrayList();
            List<Object> params = Lists.newArrayList();

            for (Class clazz : method.getParameterTypes()) {
                paramTypes.add(clazz.getName());
            }

            if (!ArrayUtils.isEmpty(args)) {
                params.addAll(Arrays.asList(args));
            }

            invocationInfo.setMethodParamTypes(paramTypes);
            invocationInfo.setParams(params);
            return invocationInfo;
        }

		//开始调用
        private RpcResult invoke(InvocationInfo invocationInfo) throws IOException {
            HttpHeaders headers = new HttpHeaders();
            headers.add("Content-Type", "application/json;charset=UTF-8");
            headers.add("traceId", MDC.get("traceId"));//日志追踪用的,可忽略
            HttpEntity<String> entity = new HttpEntity(SerializeUtil.serialize(invocationInfo), headers);
            RequestCallback requestCallback = restTemplate.httpEntityCallback(entity);
            ResponseEntity<RpcResult> response = restTemplate.execute(url, HttpMethod.POST, requestCallback, new ResponseExtractor<ResponseEntity<RpcResult>>() {
                @Override
                public ResponseEntity<RpcResult> extractData(ClientHttpResponse response) throws IOException {
                    try (InputStream inputStream = response.getBody();
                         ObjectInputStream objectInputStream = new ObjectInputStream(inputStream)) {
                        return new ResponseEntity<RpcResult>((RpcResult) objectInputStream.readObject(), response.getStatusCode());
                    } catch (Exception e) {
                        log.error(e.getMessage(), e);
                    }
                    return null;
                }
            }, new Object[0]);

            RpcResult result = response.getBody();
            if (response.getStatusCode() != HttpStatus.OK) {
                log.error("请求失败! code: {}, message: {}", response.getStatusCodeValue(), result);
                throw new RpcException("网络请求失败! 地址: " + url + ", 返回码: " + response.getStatusCodeValue() + ", 方法: " + invocationInfo.getMethodSignature());
            }

            if (result == null || !StringUtils.equals(result.getCode(), RpcResult.CODE_SUCCESS)) {
                throw new RpcException("执行失败! 方法: " + invocationInfo.getMethodSignature());
            }

            return result;
        }
    }
有了这个ServiceProxyHandler, 我们就可以Proxy.newProxyInstance来创建代理对象了, 类似:
    ServiceProxyHandler handler = new ServiceProxyHandler("http://xxxx", UserService.class, new RestTemplate());
    UserService userService = (UserService) Proxy.newProxyInstance(this.getClass().getClassLoader(), new Class[]{UserService.class}, handler);
2. 生成的代理对象,如何注册到Spring容器中
RpcInvokerRegister
@Service
public class RpcInvokerRegister implements BeanDefinitionRegistryPostProcessor {

    @Override
    public void postProcessBeanDefinitionRegistry(BeanDefinitionRegistry registry) throws BeansException {
        this.registry = registry;

        //为UserService生成代理对象,并注入到Spring容器中
        registerBean(registry, UserService.class);
    }

    private void registerBean(BeanDefinitionRegistry registry, Class clazz) {
        log.info("registering bean for class: {}", clazz);
        ServiceProxyHandler handler = new ServiceProxyHandler(backendUrl, clazz, restTemplate);
        GenericBeanDefinition definition = new GenericBeanDefinition();
        definition.setBeanClass(clazz);
        definition.setInstanceSupplier(() -> {
            try {
                RpcInvocationProxyFactory factory = new RpcInvocationProxyFactory(clazz, handler);
                return factory.getObject();
            } catch (Exception e) {
                log.error("创建实例失败! class: {}, msg: {}", clazz, e.getMessage());
                throw new BeanInitializationException(e.getMessage(), e);
            }
        });

        registry.registerBeanDefinition(StringUtils.uncapitalize(clazz.getSimpleName()), definition);
    }
}
RpcInvocationProxyFactory
    @Slf4j
    public class RpcInvocationProxyFactory implements FactoryBean<Object> {

        @Setter
        private Class clazz;
        @Setter
        private InvocationHandler invocationHandler;

        public RpcInvocationProxyFactory(Class clazz, InvocationHandler invocationHandler) {
            this.clazz = clazz;
            this.invocationHandler = invocationHandler;
        }

        @Override
        public Object getObject() throws Exception {
            Object obj = Proxy.newProxyInstance(this.getClass().getClassLoader(), new Class[]{clazz}, invocationHandler);
            return obj;
        }

        @Override
        public Class<?> getObjectType() {
            return clazz;
        }

        @Override
        public boolean isSingleton() {
            return true;
        }
    }
上述代码仅注册了一个UserService, 实际情况是我们会有很多Service需要远程调用。 仅需修改方法 postProcessBeanDefinitionRegistry 逻辑,扫描指定包下的interface循环注册即可。
至此, 整个RPC调用就完成了。 简单总结一下,只有下面两个步骤:
- 项目启动时,扫描指定package下的接口
- 扫描到的class,循环生成代理对象,注册到Spring容器
注册到Spring容器之后,其他服务就能通过@Autowire注解调用了。
采用Spring实现RPC调用
Spring提供了 Spring HTTP Invoker 组件以及Using Hessian to Remotely Call Services through HTTP来实现RPC调用功能。
原理和思路跟我们上面写的是一样的,只不过Spring封装的更完善一些。使用也很简单,大家看官方文档即可。
注意,无论是Spring的实现还是自己实现,都使用了Java的序列化技术,而Java序列化很容易导致安全漏洞(Spring 5.3已经不推荐使用Spring HTTP Invoker),所以这种RPC调用应该仅限于内网之间调用,切不可对外开放。
原创资料,转载请注明出处
Q.E.D.